Alright, ladies, listen up! We’re about to dive headfirst into the ultimate guide to conquering Everest Base Camp. Yeah, you heard that right – we’re talking about scaling the majestic heights of the Roof of the World. Now, I know what you’re thinking – isn’t that too extreme?
Well, strap on your hiking boots and get ready to have your mind blown because this epic trek is like nothing you’ve ever experienced before. From breathtaking views to unparalleled challenges, the allure of Everest Base Camp is undeniable. And guess what? You’re about to embark on this incredible journey armed with all the knowledge and tips you need to make it a legendary success.
So, hold on tight and get ready to conquer that summit because this guide will empower you to reach new heights and make memories that’ll last a lifetime. Let’s do this, ladies!
Overview of Everest Base Camp Hike
Alright, my adventure-hungry amigas, let’s get the rundown on this Everest Base Camp hike. First off, we’re talking about the Himalayas – the mother of all mountain ranges. Located in Nepal, this hike takes you through some of the most stunning scenery our planet has to offer. And we’re not just talking about panoramic views of lush forests, traditional Sherpa villages, and Himalayan peaks that will take your breath away. Oh no, this one will also take you to the heights of over 17,000 feet at Everest Base Camp.
Yeah, you heard that right – we’re talking about hiking to the base of the tallest mountain in the world. But don’t let that intimidate you, my fearless friends. While reaching the summit of Everest is reserved for the most elite mountaineers, making it to Base Camp is a feat in itself. Sure, it’s a challenging hike, but one that’s totally doable with the right preparation and attitude.
How to Prepare for the Everest Base Camp Hike

First things first, let’s talk about training. You don’t just wake up one day and decide to tackle Everest, unless you’re some kind of superhuman, in which case, please share your secret with the rest of us. No, my friend, we need to whip ourselves into shape before we even think about stepping foot on that mountain. Hit the gym, go for long hikes, and build up your stamina like you’re training for the Olympics. Trust me, those steep ascents will thank you later.
Physical Preparation
- Cardiovascular Fitness: Hiking uphill for hours requires some serious cardio. Get your heart pumping by doing regular exercises like hiking, jogging, or cycling. Aim for at least 30 minutes of exercise, 3-4 times a week, and gradually increase intensity and duration.
- Strength Training: Carrying your heavy backpack and maintaining balance on tough terrain requires strong legs and core. Include exercises like squats, lunges, and planks in your workout routine.
- Endurance: Train your body for long-distance walking by gradually increasing the length of your hikes. Try to simulate the conditions of the trek by walking on uneven terrain whenever possible.
- Mental Resilience: Trekking to Everest Base Camp isn’t just physically challenging, it can also take a toll on your mental health. Prepare yourself mentally by setting realistic expectations, staying positive, and being mentally resilient. Visualization techniques can help you stay focused on your goal.
Gear and Clothing Recommendations
- Footwear: Get yourself some high-quality, waterproof trekking boots with good ankle support. Break them in before your trek.
- Clothing Layers: Mother Nature can be unpredictable. Dress in layers to accommodate changing weather conditions. Essential clothing items include moisture-wicking base layers, insulating mid-layers, and a waterproof outer shell. Don’t forget a warm hat and gloves.
- Backpack: Choose a comfortable and durable backpack with adjustable straps. A rain cover is essential to protect your belongings during wet weather.
- Sleeping Bag: Invest in a high-quality sleeping bag suitable for sub-zero temperatures. Some teahouses provide blankets, but having your sleeping bag ensures a comfortable night’s rest.
- Trekking Poles: Trekking poles provide stability and reduce the strain on your knees during steep descents. Consider collapsible poles for convenience.
- Accessories: Sunglasses, sunscreen, a wide-brimmed hat, and a reusable water bottle are essential items to protect yourself from the harsh sun at higher altitudes.
Acclimatization Tips
- Gradual Ascent: Follow an itinerary that allows for gradual acclimatization to minimize the risk of altitude sickness. Most itineraries include rest days to adapt to higher altitudes.
- Stay Hydrated: Drink plenty of water to stay hydrated, but avoid alcohol and caffeine, as they can contribute to dehydration.
- Diamox: Consult with a healthcare professional about the use of Diamox, a medication that can help prevent altitude sickness. It’s often recommended but should only be used under medical supervision.
- Listen to Your Body: Pay close attention to any signs of altitude sickness, such as headaches, nausea, or dizziness. If you experience symptoms, it’s essential to descend to a lower altitude immediately.
- Recognizing Symptoms: Be aware of symptoms such as headaches, nausea, dizziness, and shortness of breath. If you experience these symptoms, descend to a lower altitude immediately.
Maintenance Tips for Trekking Gear
Cleaning and Drying: Clean your trekking gear regularly because, let’s face it, nobody wants to smell like a combination of sweat, dirt, and yesterday’s protein bars. Give your gear a good scrub to remove all that nastiness before it becomes a permanent part of your adventure ensemble.
Hang wet clothing and gear to dry because soggy stuff is not a good look, my friend. Find a well-ventilated area to let them air out, but for the love of all things trendy, keep them away from direct sunlight.
Use a gentle detergent because harsh chemicals are a total buzzkill. Follow those manufacturer instructions like a boss and keep your gear in tip-top shape.
Don’t forget about your boots! Wet boots can lead to blisters, and blistered feet are the opposite of fun. Take care of those babies by removing the insoles and making sure they air dry completely.
Inspecting Equipment: Regularly inspect your trekking gear because we don’t want any surprises when you’re halfway up a mountain. Check for signs of wear and tear, like frayed seams, loose threads, and zippers that have seen better days. If something looks dodgy, fix it or replace it.
Give those backpack straps, buckles, and fasteners some love too. Weakness or damage is not a good look on equipment, or on anyone for that matter. Replace any faulty pieces, because you deserve gear that actually works like it’s supposed to.
Your trusty trekking poles are not invincible, so give them the once-over. Cracks or bends after a rocky encounter? Time to bid them adieu and bring in some reinforcements.
Lubrication and Maintenance: Lubricate those zippers, buckles, and other moving parts, because squeaky gear might be annoying to you, but it’s a concert invitation to every creature in a 5-mile radius. Prevent corrosion and keep things smooth with some silicone-based lubricants.
Your leather boots need some lovin’ too. Treat them to a waterproofing agent like you’re giving them a spa day. No cracking or drying out allowed on our watch!
Give your gear a once-over for any loose screws or fasteners because nobody wants to see you chasing missing tent poles like you’re auditioning for an Olympic sport.
Packing Essential Repair Kits: Ah, the essentials. We wouldn’t want you to be caught off guard without the tools to fix your gear, would we? Here’s what you need to pack for those emergency repair situations:
Basic Repair Kit: Multi-tool or pocketknife: Because you never know when you’ll need a mini toolbox in your pocket. Screwdriver, scissors, and pliers?
Duct tape or repair tape: For all your patching, sealing, and temporarily fixing needs. It’s like the superhero cape of repair materials.
Spare cordage or nylon rope: Replace those broken shoelaces, tent guy lines, or backpack straps like a DIY genius. MacGyver would be proud.
Sewing kit: Needles, thread, and safety pins for wardrobe malfunctions and gear mishaps. Be your own fashion designer and gear repair expert on the go.
Super glue or epoxy adhesive: Bonding materials and fixing small cracks or breaks like a pro.
Footwear Repair Kit
Spare laces: Because nobody wants to be left high and dry with no boot laces. Pack those spares, and keep your trekking mojo intact.
Seam sealant: Repair small tears and delamination in boot seams or soles.
Boot patches or adhesive patches: Cover those holes and abrasions in your boot uppers like you’re playing hide and seek with wear and tear.
Tent Repair Kit
Fabric patches or repair tape: Fix tears or holes in your tent fabric like a camping superhero. No rain or bugs are getting through your fortified fortress.
Tent pole splint or repair sleeve: Repair bent or broken tent poles like you’re conducting a surgical procedure. Your tent will stand tall and proud, just like you.
Seam sealer or waterproofing spray: Reseal seams and reinforce waterproof coatings because a soggy tent is a sad tent.
Miscellaneous Items:
Safety pins: Because life is unpredictable, and sometimes you need a quick fix. Wardrobe malfunction? Safety pin to the rescue!
Spare batteries: Don’t let your headlamp or GPS device give up on you when you need them most.
Spare parts: Stove O-rings, tent pole segments, inflatable mattress patches – bring whatever your gear might need.
By packing these essential repair kits and tools, and following proper maintenance procedures, you’ll be well-equipped to handle any gear mishaps that come your way. No broken buckles or frayed seams can stand in the way of your epic trekking adventure. You’re a force to be reckoned with, my fearless traveler!
Health and Safety Precautions
First Aid Kit Essentials: Carrying a well-stocked first aid kit is essential for addressing common trekking injuries and ailments. Here are some essential items to include:
Bandages and adhesive tape for treating cuts and blisters.
Antiseptic wipes or solution for wound cleaning.
Pain relievers like ibuprofen or acetaminophen for headaches and muscle soreness.
Antidiarrheal medication to treat gastrointestinal issues.
Anti-nausea medication for alleviating symptoms of altitude sickness.
Oral rehydration salts to replenish electrolytes lost through sweating.
Thermometer for monitoring fever.
Tweezers and safety pins for removing splinters or foreign objects.
Any personal medications you may require (e.g., asthma inhaler, allergy medication).
Hygiene and Waterborne Illnesses: Maintaining good hygiene practices is crucial for preventing waterborne illnesses during the trek. Here are some tips:
Water Purification: Avoid drinking untreated water from streams or taps along the trekking route. Instead, use water purification tablets, filters, or portable water purifiers to ensure safe drinking water.
Hand Hygiene: Wash your hands frequently with soap and water, especially before eating or after using the restroom. If soap and water are unavailable, use alcohol-based hand sanitizer.
Food Safety: Choose freshly prepared meals from reputable teahouses and lodges. Avoid consuming raw or undercooked foods, and opt for hot, thoroughly cooked dishes.
Dental Hygiene: Use bottled or treated water for brushing your teeth to avoid ingesting contaminated water.
Sanitation: Dispose of waste properly in designated bins or carry out any non-biodegradable waste. Practice Leave No Trace principles to minimize environmental impact.
Now that you’re equipped with these tips, get out there and show the world what badass girls can do!
The Route and Itinerary

So, the most popular route to Everest Base Camp starts in Lukla, a tiny town with an airport (yes, they have an airport in the middle of the mountains, because why not?). This gem of a town is nestled in the Solukhumbu region of Nepal. From Lukla, you’ll be following the Dudh Koshi River valley, and let me tell you, it’s a sight to behold. Picture yourself walking amidst the beauty of mother nature, passing through charming Sherpa villages that could easily be mistaken for postcard-worthy scenes. And guess what? This is just the warm-up before you finally reach the holy grail of trekking: Everest Base Camp.
Ideal Itinerary For The Basecamp Hike
Lukla to Phakding (2,651m) – Day 1-2: Strap yourself in for a scenic flight from Kathmandu to Lukla, then trek your way to Phakding. Remember, it’s not just about the destination; it’s about the journey, the sore legs, and the breathtaking views that make it all worth it.
Namche Bazaar (3,440m) – Day 3-4: Trek your way to the buzzing Sherpa capital of Namche Bazaar. Take your time to explore the town and acclimate to the altitude. Spoiler alert: you’ll become the queen of acclimatization.
Tengboche (3,860m) – Day 5: Pay a visit to the famous Tengboche Monastery and soak in the awe-inspiring views of Everest and its majestic peaks. It’s like a spiritual quest with a side of cardio.
Dingboche (4,360m) – Day 6-7: Get ready for a journey through charming rhododendron forests and picturesque villages as you ascend to Dingboche. Oh, and don’t forget to take a day to fully embrace your acclimatization and conquer Nagarjun Hill for those epic panoramic views. You’ll be feeling on top of the world.
Lobuche (4,940m) and Gorak Shep (5,160m) – Day 8-9: Trek your way to Lobuche and then embark on a daring expedition to Gorak Shep. From there, it’s time for the ultimate highlight: the epic journey to Everest Base Camp (5,364m). Step by step, and once you reach there, take a bow, queen of the mountains.
Kala Patthar (5,550m) and Pheriche (4,240m) – Day 10: Rise and shine, it’s time to conquer Kala Patthar and witness the sunrise over Mount Everest. Grab your camera and be ready to capture those Instagram-worthy shots. Then descend to Pheriche for a well-deserved rest. You’ll be dreaming of that sunrise view for years to come.
Namche Bazaar and Lukla – Day 11-12: It’s time to retrace your steps, descend through familiar villages, and make your way back to the familiar streets of Namche Bazaar and Lukla. Reflect on your epic adventure and bask in the glory of your achievements.
Most Agencies will have 14-16 Days total listed for the trek. Keep this in mind when you need to take time off of work for this feat.
Alternative Trek Experience
Exploring alternative routes and side trips can offer trekkers a unique perspective of the Everest region and enrich their overall experience. Here’s an overview of some lesser-known trekking routes and side trips.
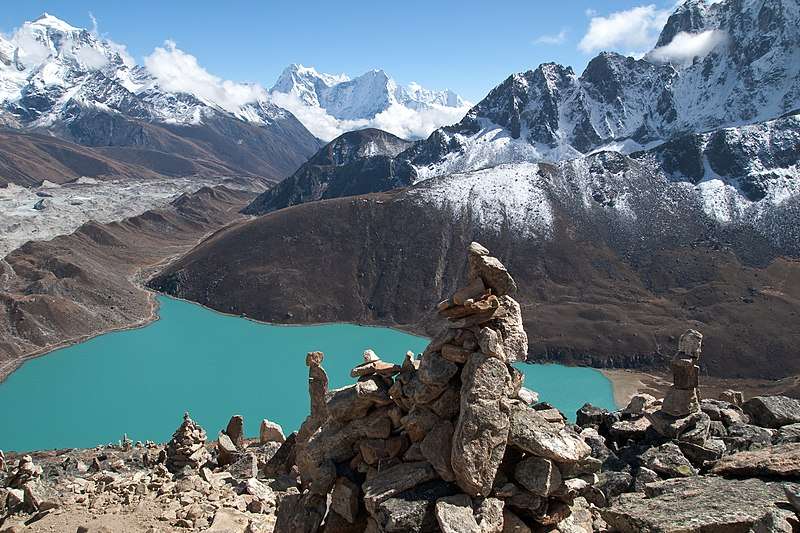
Gokyo Lakes Trek: This trek offers stunning views of the Gokyo Lakes, a series of turquoise glacial lakes nestled amidst the towering peaks of the Everest region. The route passes through remote Sherpa villages, high mountain passes, and pristine valleys. Highlights include Gokyo Ri, a panoramic viewpoint offering breathtaking vistas of Everest, Lhotse, Makalu, and Cho Oyu.
Three Passes Trek: For the adventurous trekkers seeking a challenge, the Three Passes Trek offers an exhilarating journey across three high mountain passes: Renjo La Pass, Cho La Pass, and Kongma La Pass. This route provides unparalleled views of Everest, Lhotse, Nuptse, and other Himalayan giants, as well as opportunities to explore remote valleys and traditional Sherpa settlements.
Side Trips and Extensions
Everest View Hotel: Located in the village of Syangboche, the Everest View Hotel offers panoramic views of Mount Everest and its neighboring peaks. Trekkers can take a short detour from Namche Bazaar to visit the hotel and enjoy a cup of tea while soaking in the majestic scenery. The hotel also provides a unique perspective of the Everest region and serves as a popular acclimatization spot for trekkers.
Thame Village: Situated off the main trekking route to Everest Base Camp, Thame is a picturesque Sherpa village renowned for its cultural heritage and stunning mountain vistas. Trekkers can take a detour from Namche Bazaar to visit Thame and explore its ancient monasteries, traditional stone houses, and serene surroundings. The village also serves as a gateway to the remote Nangpa La Pass, a historical trading route to Tibet.
Booking the Everest Base Camp Trek and Costs
Alright, my fearless adventurers, let’s talk about the all-important task of booking your Everest Base Camp trek. Brace yourselves, because there are several options to choose from, and each comes with its own set of pros and cons. It’s time to decide how you want to conquer those mighty mountains on your terms.
Booking through a Trekking Agency
Pros
Expertise: Trekking agencies have got the Himalayan trekking game down. They’ve got the knowledge and experience to guide you through this adventure without breaking a sweat. Trust them to provide valuable guidance and support along the way.
Convenience: Don’t feel like dealing with the nitty-gritty logistics? No worries! Trekking agencies have got you covered. They’ll handle the permits, accommodations, meals, and transportation, leaving you with zero hassle and more time to focus on doing your hair in a fierce mountain bun.
Safety: Safety first, my trailblazing queens! Trekking agencies prioritize your well-being and are equipped to handle any emergencies that may arise. They’ll provide experienced guides who know their way around those mountains like the back of their hand. And if you need an extra boost, they might even throw in a porter or two. Who says being a fierce independent traveler means you can’t get a little help when you need it?
Group or Solo: Ready to conquer those mountains with some like-minded badassery? Trekking agencies offer options for both group and solo treks, allowing you to choose according to your preferences. Whether you’re all about that solo empowerment or want to form a kickass trekking crew, the choice is yours.
Cons
Cost: Ah, yes, the price of convenience. Booking through an agency can bite a little harder in the wallet, thanks to those dreaded service fees. But hey, look at it this way: sometimes you’ve gotta pay to play, and in this case, the price might just be worth all the convenience and support you get in return.
Limited Flexibility: We get it, you like to do things your way. Group treks organized by agencies often come with fixed itineraries and schedules, which can cramp your style a bit. Customizing the trek to your heart’s desire might take a bit more effort when you’re booking through an agency. But hey, who said blazing your own trail was supposed to be easy?
Organizing the Trek Independently
Pros
Cost Savings: Think you’ve got the budgeting chops to save some serious cash? The good news, independent trekkers can book accommodations and meals directly at teahouses and manage permits themselves, which can be a real money-saver.
Flexibility: Sometimes, you need the power of choice, right? Going solo means making decisions on the fly and having complete control over your itinerary. Want to stop for that perfect Instagram shot? Go for it!
Cons
Logistics: Let’s be honest; managing permits, accommodations, and transportation can be complex and time-consuming, especially if you’re a first-time trekker. But hey, there’s nothing like a bit of a challenge, right?
Safety: Safety first, my trailblazing queens! Independent trekkers may not have access to emergency assistance or experienced guides or porters, which can be a safety concern in the remote areas of your journey.
Cost Considerations of The Total Trip
A rough estimate if you are coming from the States for a trek you would be looking at:
- $900-1400 for a Flight to Kathmandu, Nepal.
- $1000-$5000 for the Trek itself, dependent upon whether you plan to use a guide or independently.
Guided Trek
On average, a guided trek through an agency can cost anywhere from \$1,000 to \$5,000 or more, depending on the duration, level of service, and time of year. But are you willing to pay for that extra support and convenience?
Independent Trek
So you fierce, independent ladies can complete the trek for approximately $1,000 to $1,500, including permits, accommodations, meals, and transportation. Remember, though, that your costs can vary based on your spending habits.
If you’re feeling like you need a little help on the Everest Base Camp trek, research and select a reputable agency with a proven track record. Here are some options to consider:
Himalayan Glacier ($2570-$3200 for Trek)
Known for experienced guides and well-organized treks.
Adventure Consultants (approx. $5000 for Trek)
Offers guided treks and mountaineering expeditions with a focus on safety. You may have remembered them from the 2015 movie “Everest”.
World Expeditions ($2800 For Trek)
Known for its sustainable and responsible trekking practices.
Discovery World Trekking ($1530)
Discovery World Trekking is known for its team of experienced and knowledgeable guides who are familiar with the Everest region.
Remember that all prices only include the trek and do not include airfare to Nepal itself. It is best to check out the sites to see what is included and excluded from the fare.
If you’re ready to take on the trek solo, make sure to do your research, have a detailed itinerary, and ensure you have all the necessary permits and equipment. And, if you’re feeling like you could use a little safety and support, don’t be afraid to hire a local guide or porter. Ultimately, the choice between booking through an agency or organizing it yourself depends on your budget, level of experience, and personal preferences.
Importance of Responsible Trekking Practices
Alright, fearless trailblazers, let’s talk about why responsible trekking practices are the bomb when it comes to keeping the Everest region pristine for all the future badass adventurers out there. By sticking to Leave No Trace principles and not trashing the place like a frat party gone wrong, we can protect those fragile mountain ecosystems and show Mother Nature some well-deserved love. So, here are some key moves to keep in mind:
Plan Ahead and Prepare: Don’t be a clueless wanderer – do your homework! Research that trekking route, check the weather forecast, and know the local rules before you hit the trail. Proper planning not only saves your butt from disasters but also keeps the environment happy.
Dispose of Waste Properly: Listen up, wild ones, carry your trash and dump it like a responsible adult in designated bins or take it back to the nearest town. Nobody wants to see your energy bar wrappers clogging up the landscape, okay?
Leave What You Find: Don’t be a rock snatcher or a flower thief. Leave those natural goodies untouched and let them be. The environment doesn’t need your souvenir collection, trust me.
Respect Wildlife: Look but don’t touch, alright? Keep your distance from the critters, don’t feed them your snacks, and definitely don’t ruin their day with your human shenanigans. Respect their space, just like you’d want them to respect yours.
Be Considerate of Other Visitors: Keep those decibels down, give way to your fellow trekkers, and show some love to those cultural and religious sites you come across. It’s called manners, people, and they go a long way.
Minimizing Environmental Impact: Now, let’s get practical on how to kick butt without trashing the place:
Carry Reusable Water Bottles: Ditch the single-use plastic bottles and bring along a reusable one. Fill it up from purified sources along the way and say sayonara to unnecessary plastic waste.
Pack Light and Wisely: Less is more, my friends. Choose lightweight, durable gear, pack only what you need, and consider bulk buying to cut down on unnecessary packaging. Keep it simple, keep it smart.
Use Biodegradable Toiletries: Save the planet, one shower at a time. Opt for biodegradable soaps and shampoos to keep those water sources clean and happy. Oh, and no washing your undies in the streams, please.
Opt for Eco-Friendly Accommodations: Support those lodges and teahouses that give a damn about the environment. Recycling, composting, energy conservation – show them some love and stay in places that are eco-friendly rockstars.
Offset Your Carbon Footprint: Feeling guilty about your trekking impact? Offset that carbon footprint by getting involved in carbon offset programs or planting trees in Nepal. It’s like hitting the reset button on your environmental karma.
Local Conservation Efforts: Let’s give back to the environment we love so much:
Volunteering with Local NGOs: Get your hands dirty (literally) by volunteering with local nonprofit organizations involved in conservation projects. Plant some trees, manage some waste, or educate others – make a difference, one trek at a time.
Donating to Conservation Organizations: Put your money where your mouth is by supporting reputable conservation organizations in the Everest region. Help them fund crucial projects and restore habitats – your wallet can be a superhero too.
Participating in Clean-up Campaigns: Join those clean-up crusaders and be part of the solution. Remove that litter, restore those habitats, and show some love for the environment. It’s like a trekking spa day, but with trash bags and a sense of accomplishment.
Final Thoughts
Listen up, my fearless adventurers! As you gear up for your epic Everest Base Camp adventure, I want you to remember that this journey is not just a physical slog up a mountain. No, no, my trailblazing ladies, it’s so much more than that!
Every step you take on this trek is a passport to an experience that will be etched in your memory for a lifetime. You’ll be surrounded by majestic peaks that make you feel like a tiny speck in the grand scheme of the universe. And when you’re done conquering those mountains, you can cozy up in teahouses, sipping hot beverages and swapping stories with fellow trekkers who understand the magic of what you’re doing.
Now, my brave souls, here’s the best part: you get to choose how you want to embark on this incredible journey. Whether you decide to embrace the guidance and convenience of the guided path or venture out solo like the fiercely independent woman you are, this is your chance to take control and write your own freaking adventure story amidst the Himalayan wonderland! And, no matter where you go, always remember to Travel Till You Drop!